
ICM & Pcomp Final Project
Link to project sketch in p5 web editor
The DrumDrop
For my joint end-of-semester project for Allison Parrish’s ICM class and Danny Rozin’s Pcomp class, I created a drum machine/step sequencer in Javascript designed tor use with an Arduino-powered device that changes the sound output when it scans for RFID tags.
I’m calling my resulting toy instrument “The DrumDrop.” The name is derived from the teardrop shape of the device’s enclosure and (borrowing from an inspiration) the central interaction of “dropping” objects in range of the RFID reader. Plus it’s the only name idea I’ve liked.
Up top, I’ll say that what I like most about this project is that I know beyond a shadow of a doubt that I would not have been able to make something like this just a few months ago. For all the changes and compromises I made between my initial plans and now, I do think it demonstrates my progress (and where I want to keep improving) with programming, design, fabrication, etc.
Ideation
About midway through the semester, I decided I wanted to combine my final projects for ICM and Pcomp and involve sound somehow. This largely came from wanting to push myself to work on something I thought would be fairly challenging and out of my comfort zone–though I can sort of play one instrument, I don’t think of myself as a musician, and I have found every DAW I’ve laid eyes on to be intimidating.
The first idea I presented in Pcomp was for a “Household Goods Sequencer,” initially envisioned as a box with an array of sensors that would detect and set an 8 beat pattern based on the placement of various objects.
I was partial to the idea of a device running on a loop and “needing” something to be present in a particular spot on a given beat in order to play, establishing a timing push-pull with the user. To get a certain pattern you’d need to at least be deliberate in your placement of items, and perhaps the sequence you’re placing/swapping them in.
This got me thinking about choreography–and got me off track from focusing on audio. My revised idea was an “exploded” device. It’d have just one main sensor, but the p5 sketch the Pcomp piece would control would also use a webcam to detect the color of certain target pixels. These would be spaced out such that a person or set of people responsible for setting a sequence from the pixels (with objects or attire in the color to be detected) would need to move between their marks in a very deliberate, dance-like manner. While on this idea, I was thinking a lot about the way David Byrne’s American Utopia show split up duties that a single drummer could normally accomplish across about a half-dozen people to allow the whole troupe to be mobile.
Of course that show thrives largely because the songs, all of which existed before it, were so good. I needed to change course, because adding choreography and song composition (two things I’m not versed in) on top of the technical would have gone nowhere fast.
Getting Covid over Thanksgiving sealed the deal on that. I had originally planned to have the sequencer more developed by the end of that period and to r,each out to classmates who could participate in the staging of my project, but by the time I began feeling better I knew it was time to scope down. Focus on the sound output and the idea of controlling it with the presence of objects, not so much on the look–though I did still want it to be playful and something that could potentially be used not just for self-amusment, but performance.
I’m a long-time fan of games from Harmonix, and their now-discontinued Dropmix system (a device for making Girl Talk-esque mashups) came to mind as I whittled this idea. I wanted my project to at least be extendable, in theory, to music composition in a way that a mashup system created around stems of existing songs isn’t.
Programming
For a rundown of the initial work I did on creating the drum machine in p5, see this earlier ICM blog post.
The core additions I made to that project to make this one possible were memory storage and retrieval functions plus another function that lets me me swap out the sounds associated with each point in the step sequencer array.
I worked on those features without leaning on existing code or tutorials. As such, I don’t really know if my solutions for those features are great–I doubt elegance was achieved here. They work, though, and were added without incurring any performance losses as far as I could tell.
The same can’t be said of adding more from there, particularly with effects. If I were to keep working on this project, I’d absolutely investigate using an alternative to p5.sound like tone.js, because I know that something I’ve done in terms of broadening the instrument/effects set has accelerated the degradation in performance that would come with earlier versions of the sequencer.
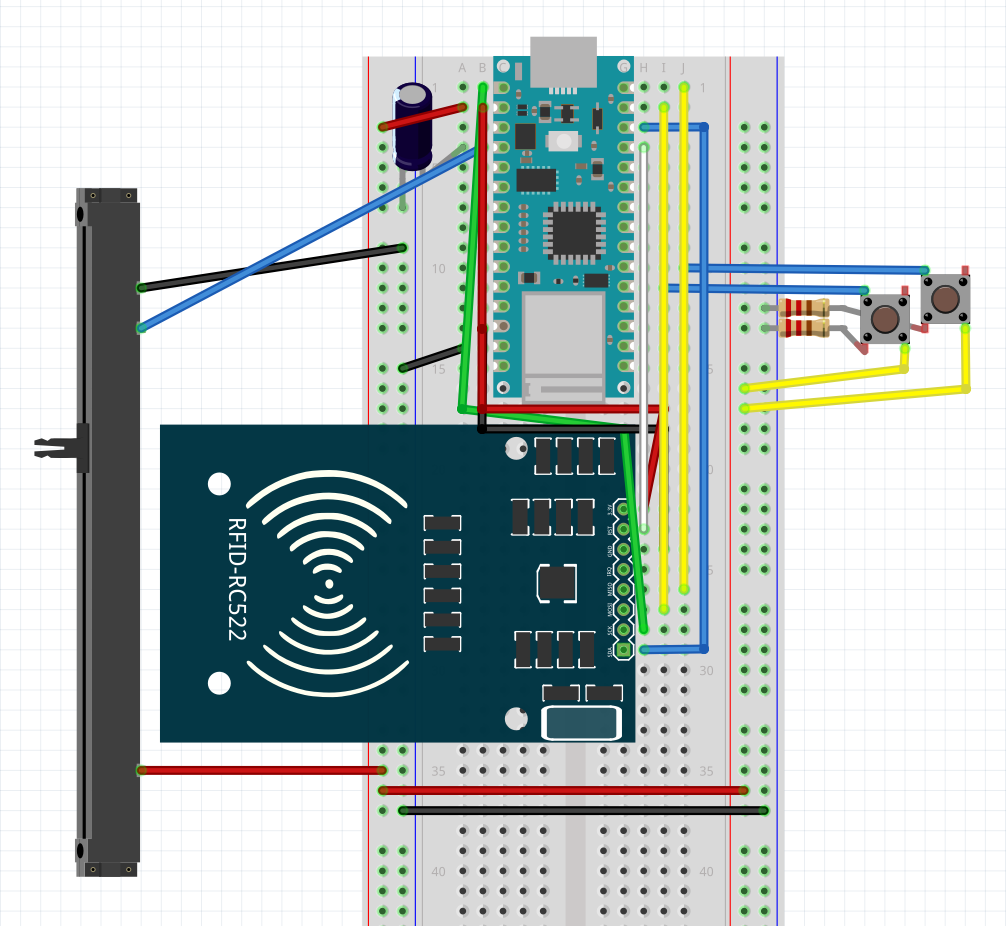
This project relies on the W3C Web Serial API and on the code Tom Igoe wrote for handling Web Serial in the Pcomp labs. The code running on the Arduino is pretty straightforward, riffing on various examples of communication with ASCII we went over in Danny Rozin’s class. There is no duplexed/two-way communication in use here, just sending data from the Arduino to the sketch, though I did make an attempt at this during development to try and solve a lingering issue with the project discussed later.
The MFRC522 Arduino library, maintained first by Miguel Balboa and later by Rotzbua, was essential in interfacing with my chosen RC522 reader module. A few resources online (Jobit Joseph’s RC522 tutorial at Circuit Digest, this page at Last Minute Engineers) were somewhat useful in understanding the module, but the biggest help in understanding how to connect the RC522 to the Arduino Nano 33 IoT came from comments throughout the MFRC522 library and its included examples.
How it works/flow explanation
After getting the MFRC522 connected properly for testing, the library example that informed my approach to using my RFID NTAG203 chip tags purchased from Adafruit was ReadNUID. For the purposes of this project, I knew that reading a large amount of data off the tags would have two downsides. First, though fairly speedy, dumping a chip’s entire contents takes long enough that it could introduce lag in the instrument/pattern swapping interaction. Second, in this state the project has no use for all that data–I’m triggering actions in the p5 sketch based on the presence of different objects, and that’s all. For that reason, pulling a byte from the NUID that’s unique across the tags used in the project is sufficient for these interactions and works fast and reliably enough that a user can trigger actions in time with the tempo (harder when fully sped up).
In brief, the DrumDrop project works as follows.
- The p5 drum machine initializes and begins serial communication with the connected Arduino.
- Beginning fresh/from reset state, the RC522 module sends “0” over the line for control of the drum machine. The default instrument set is selected, but no sequence/pattern is set.
- At any time, a user can press the play/pause button to start the sequence, manipulate the slide potentiometer to set the tempo, or press the mode button to switch between three RFID-controlled modes.
- Placing one of the project’s tagged control objects over the module will send that object’s unique byte to p5 via serial.
- In the first mode, that action sets a sequence associated with that tag.
- In the second mode, it swaps the set of instruments in use.
- In the third mode, it triggers a special action.
- While in the “play” state, a milliseconds timing sequence checks to see if a set interval (controlled by the tempo potentiometer) has passed, allowing the user to set the BPM between ~60 and 300. Each time the interval is cleared on a frame, the draw loop triggers the sequence objects associated with that position to play their sounds with the current set of enabled instruments.
- The position counter is rest to zero after 16 beats.
Design and fabrication
Once I scoped down the project from the earlier “exploded” idea, I knew one of the forms is could ultimately take would just be… a box. I wanted to at least push myself to make something a bit more visually interesting, something that wouldn’t immediately invoke a digital instrument and that might invite more curiosity based on its appearance.
Maybe a bit ambitious considering that I did not take Intro to Fabrication this semester. I feel like working on this tiny project has taught me a valuable lesson: working small is difficult, especially when it comes to wiring!
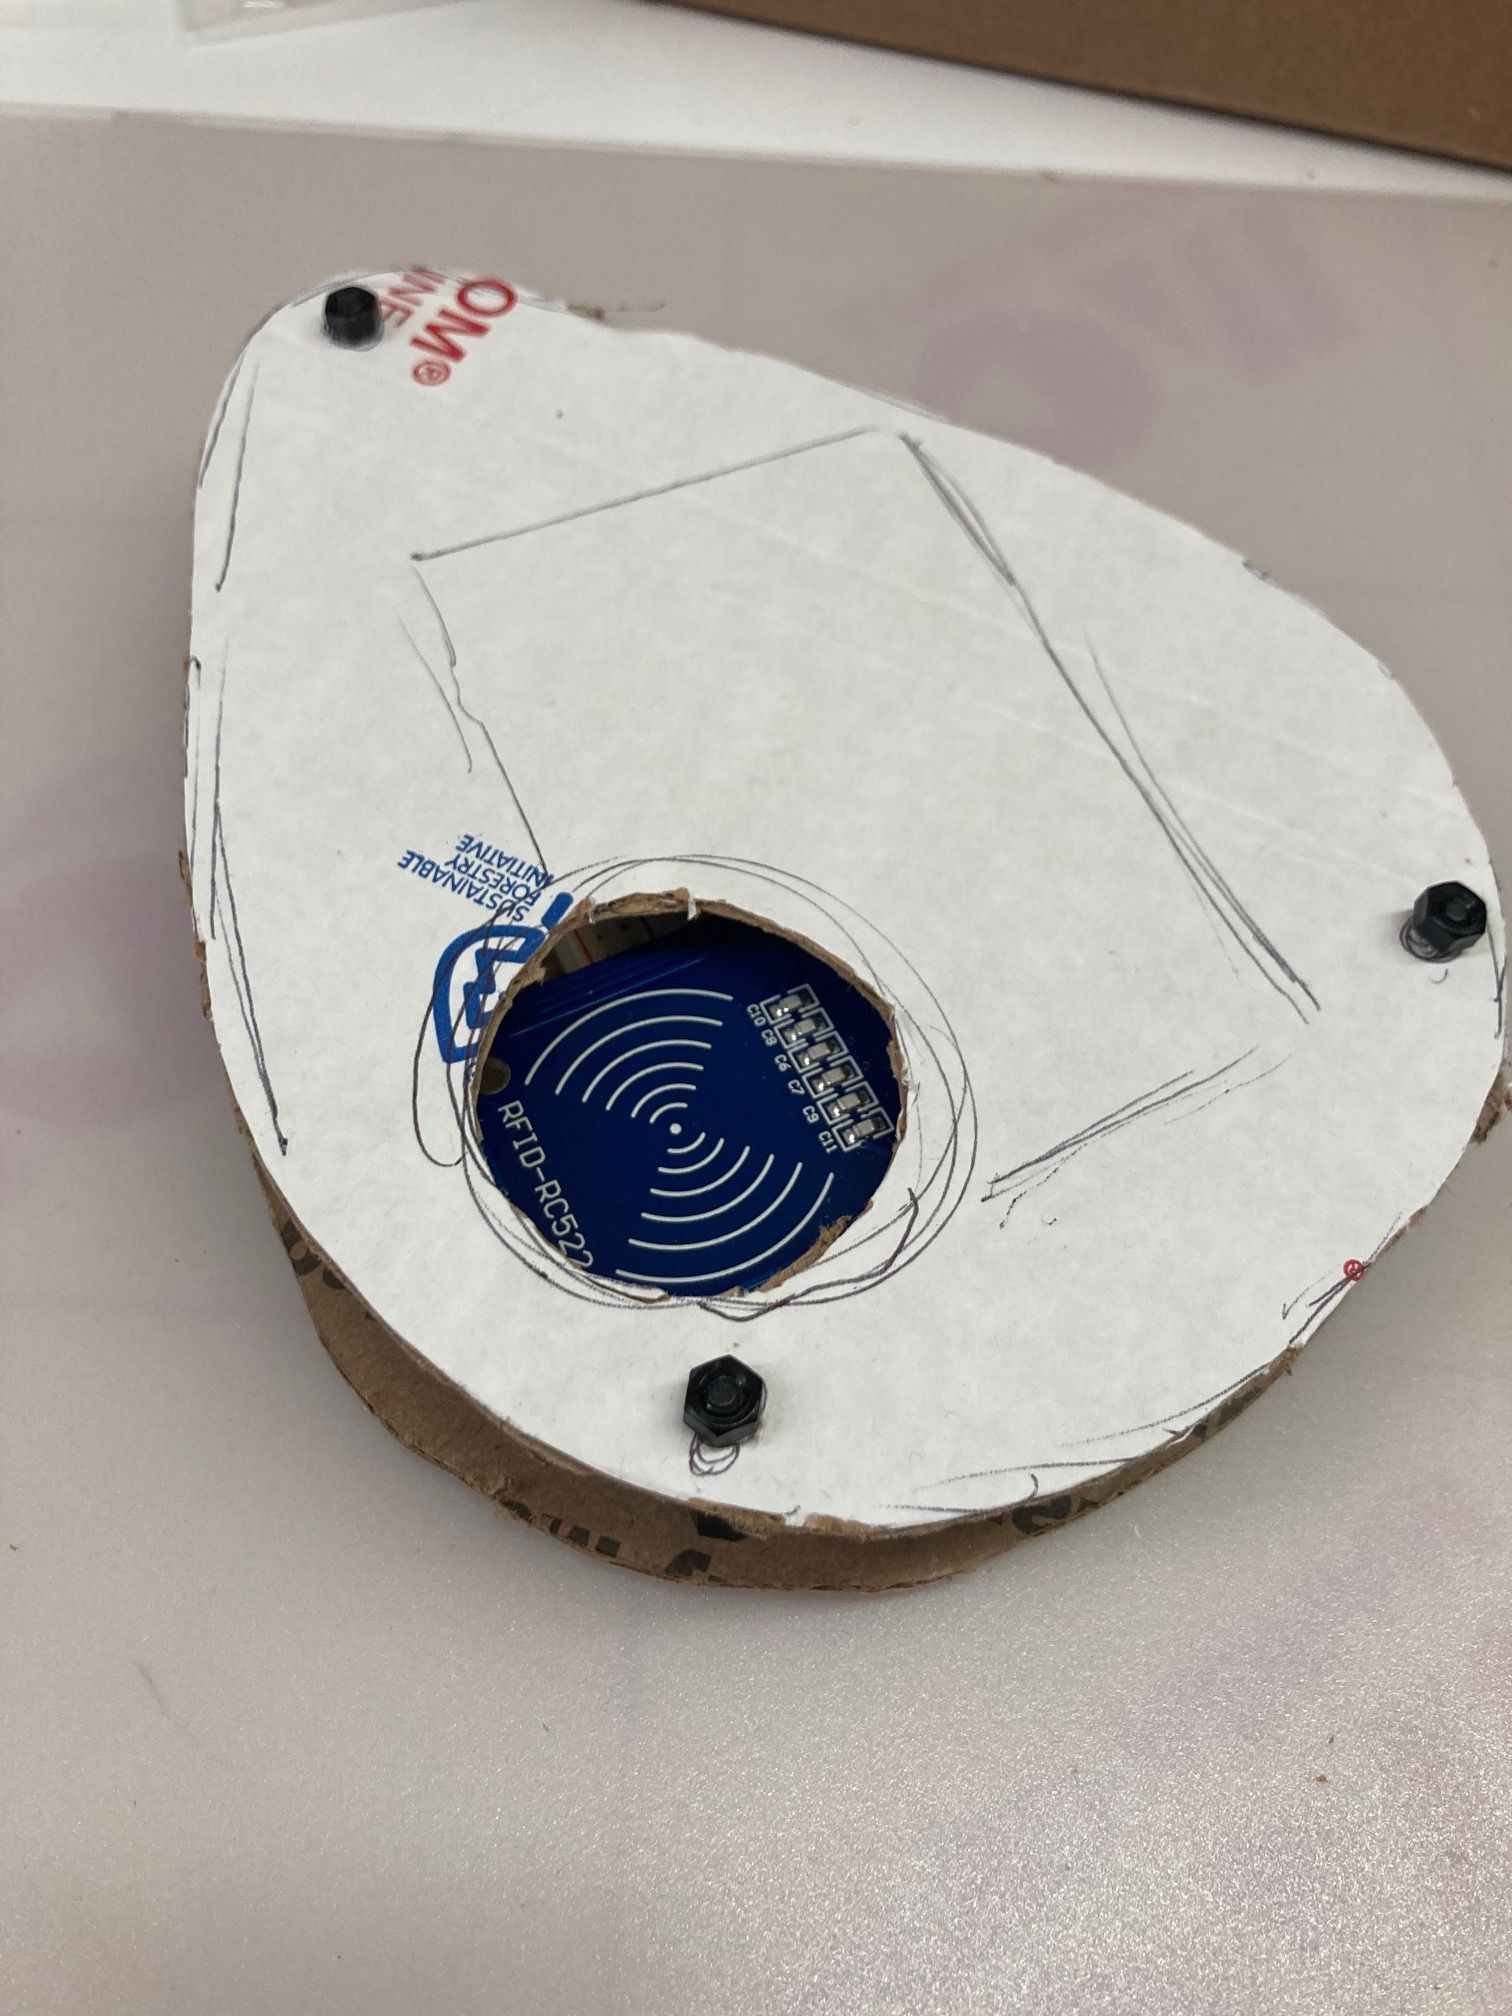
The teardrop/egg shape is sort of a favorite of mine (earlier this year I made a similarly shaped cutting board in a one-night woodworking class) and after some sketching I determined that I could fabricate two halves of a basic enclosure in that shape from a 12”x12” piece of acrylic I had left over from a years-old project.
This was my first time using the laser cutter for anything beyond basic 90-degree cuts as I did with my Pcomp midterm. Thankfully my initial measurements were adequate for the main body of the enclosure. The first pieces I cut to secure the potentiometer and buttons did not leave enough clearance to fit them through, but this was easily fixed and there was more than enough acrylic left over for the redone pieces.
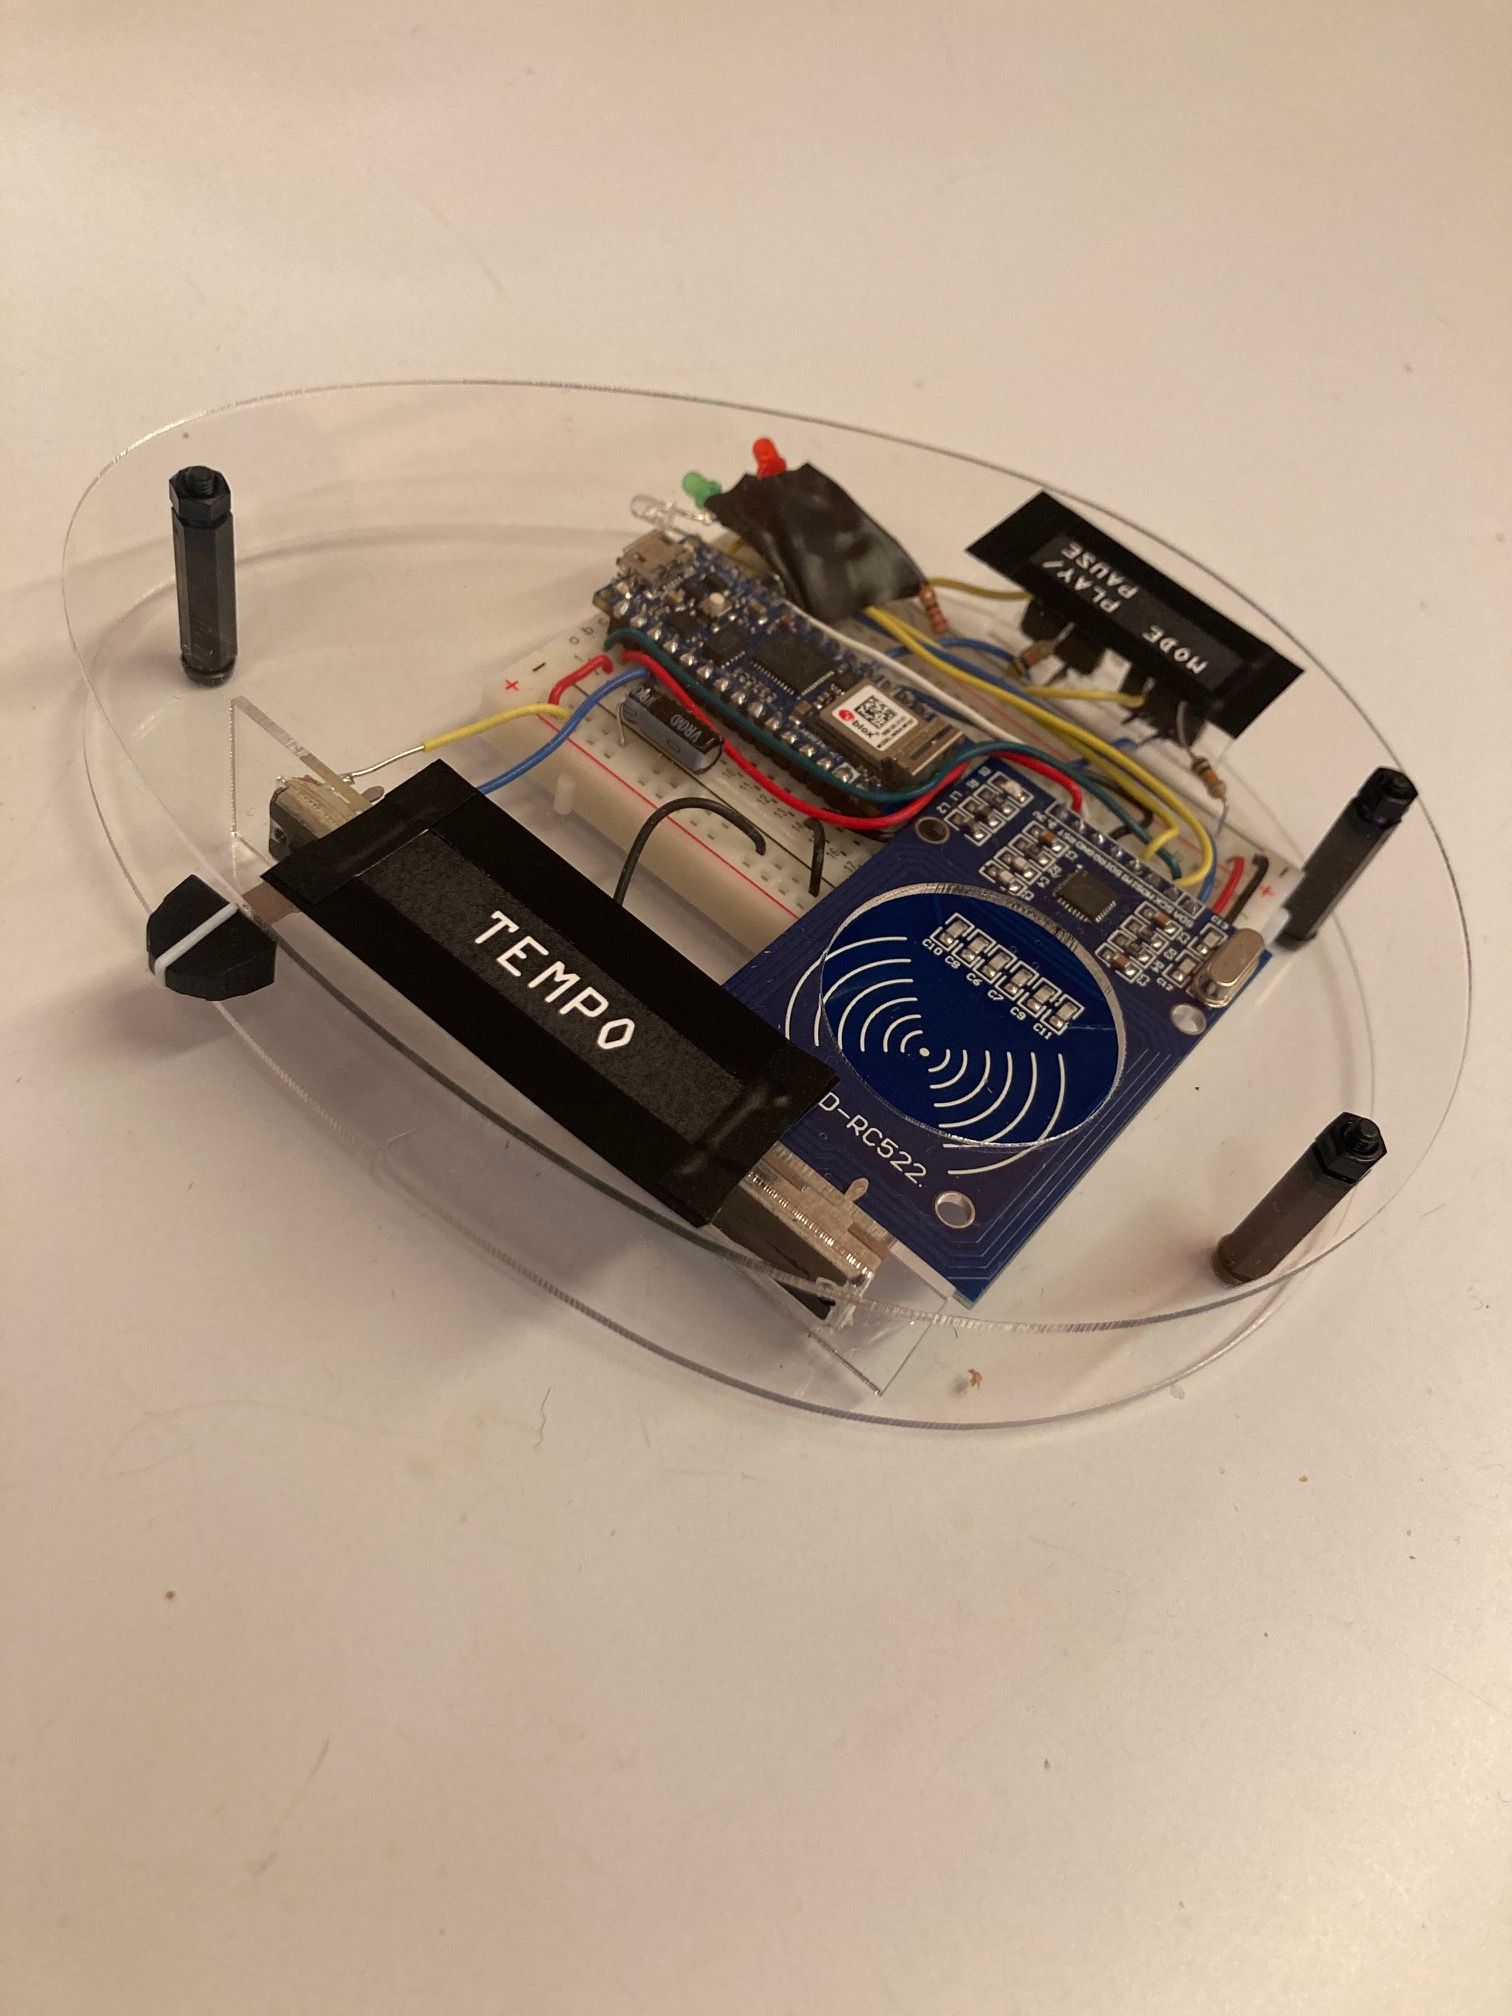
Messiness of my wiring and basic labeling aside, I think if there’s one thing that confirms my relative inexperience with fabrication here, it’s the appearance of the gluing job. I tried using ordinary Gorilla Glue to secure the slider, but later used E6000 glue (thanks Sam De Armas) to secure the components in place and to stand their acrylic shrouds vertically on the enclosure’s base. Three nylon standoffs sourced from a kit purchased through Tinkersphere attach the top and bottom of the enclosure.
Toward the end of fabrication, I decided I wanted to add mode indicator lights so that the DrumDrop would be easier to use without any sort of visual UI from the p5 sketch. Another good lesson: it may not be worth squeezing in a feature like this when it wasn’t planned for in the enclosure design (the lights aren’t even particularly bright).
Known technical issues
- When switching between modes, you can’t immediately re-read a tag that was last read on the previous mode. This is something I attempted to solve with communication back and forth between p5 and arduino to clear or reset what the RFID module is sending on a mode switch. If there’s one thing I’d spend more time fixing, it’s this.
- The detection range on the RFID module is pretty short, about an inch or two above the module’s surface. Even with the small profile of the controller & the steps taken with my scannable objects, if I were to make another RFID project with this module I’d keep the range issue in mind.
- Instruments can be triggered off-beat if swapped quickly in an interval.
- Playback performance. This is the big p5.sound issue dogging my project. If I ever do another project in a similar vein, exploring other libraries will be part of the process.
- Mode indicator lighting is not synchronized with actual modes if sketch is reset while controller is connected.
- NEW as of morning of 12/13–one of the tags stopped working, as well as my sequence randomizer function. Classic stuff!
Sound and presentation
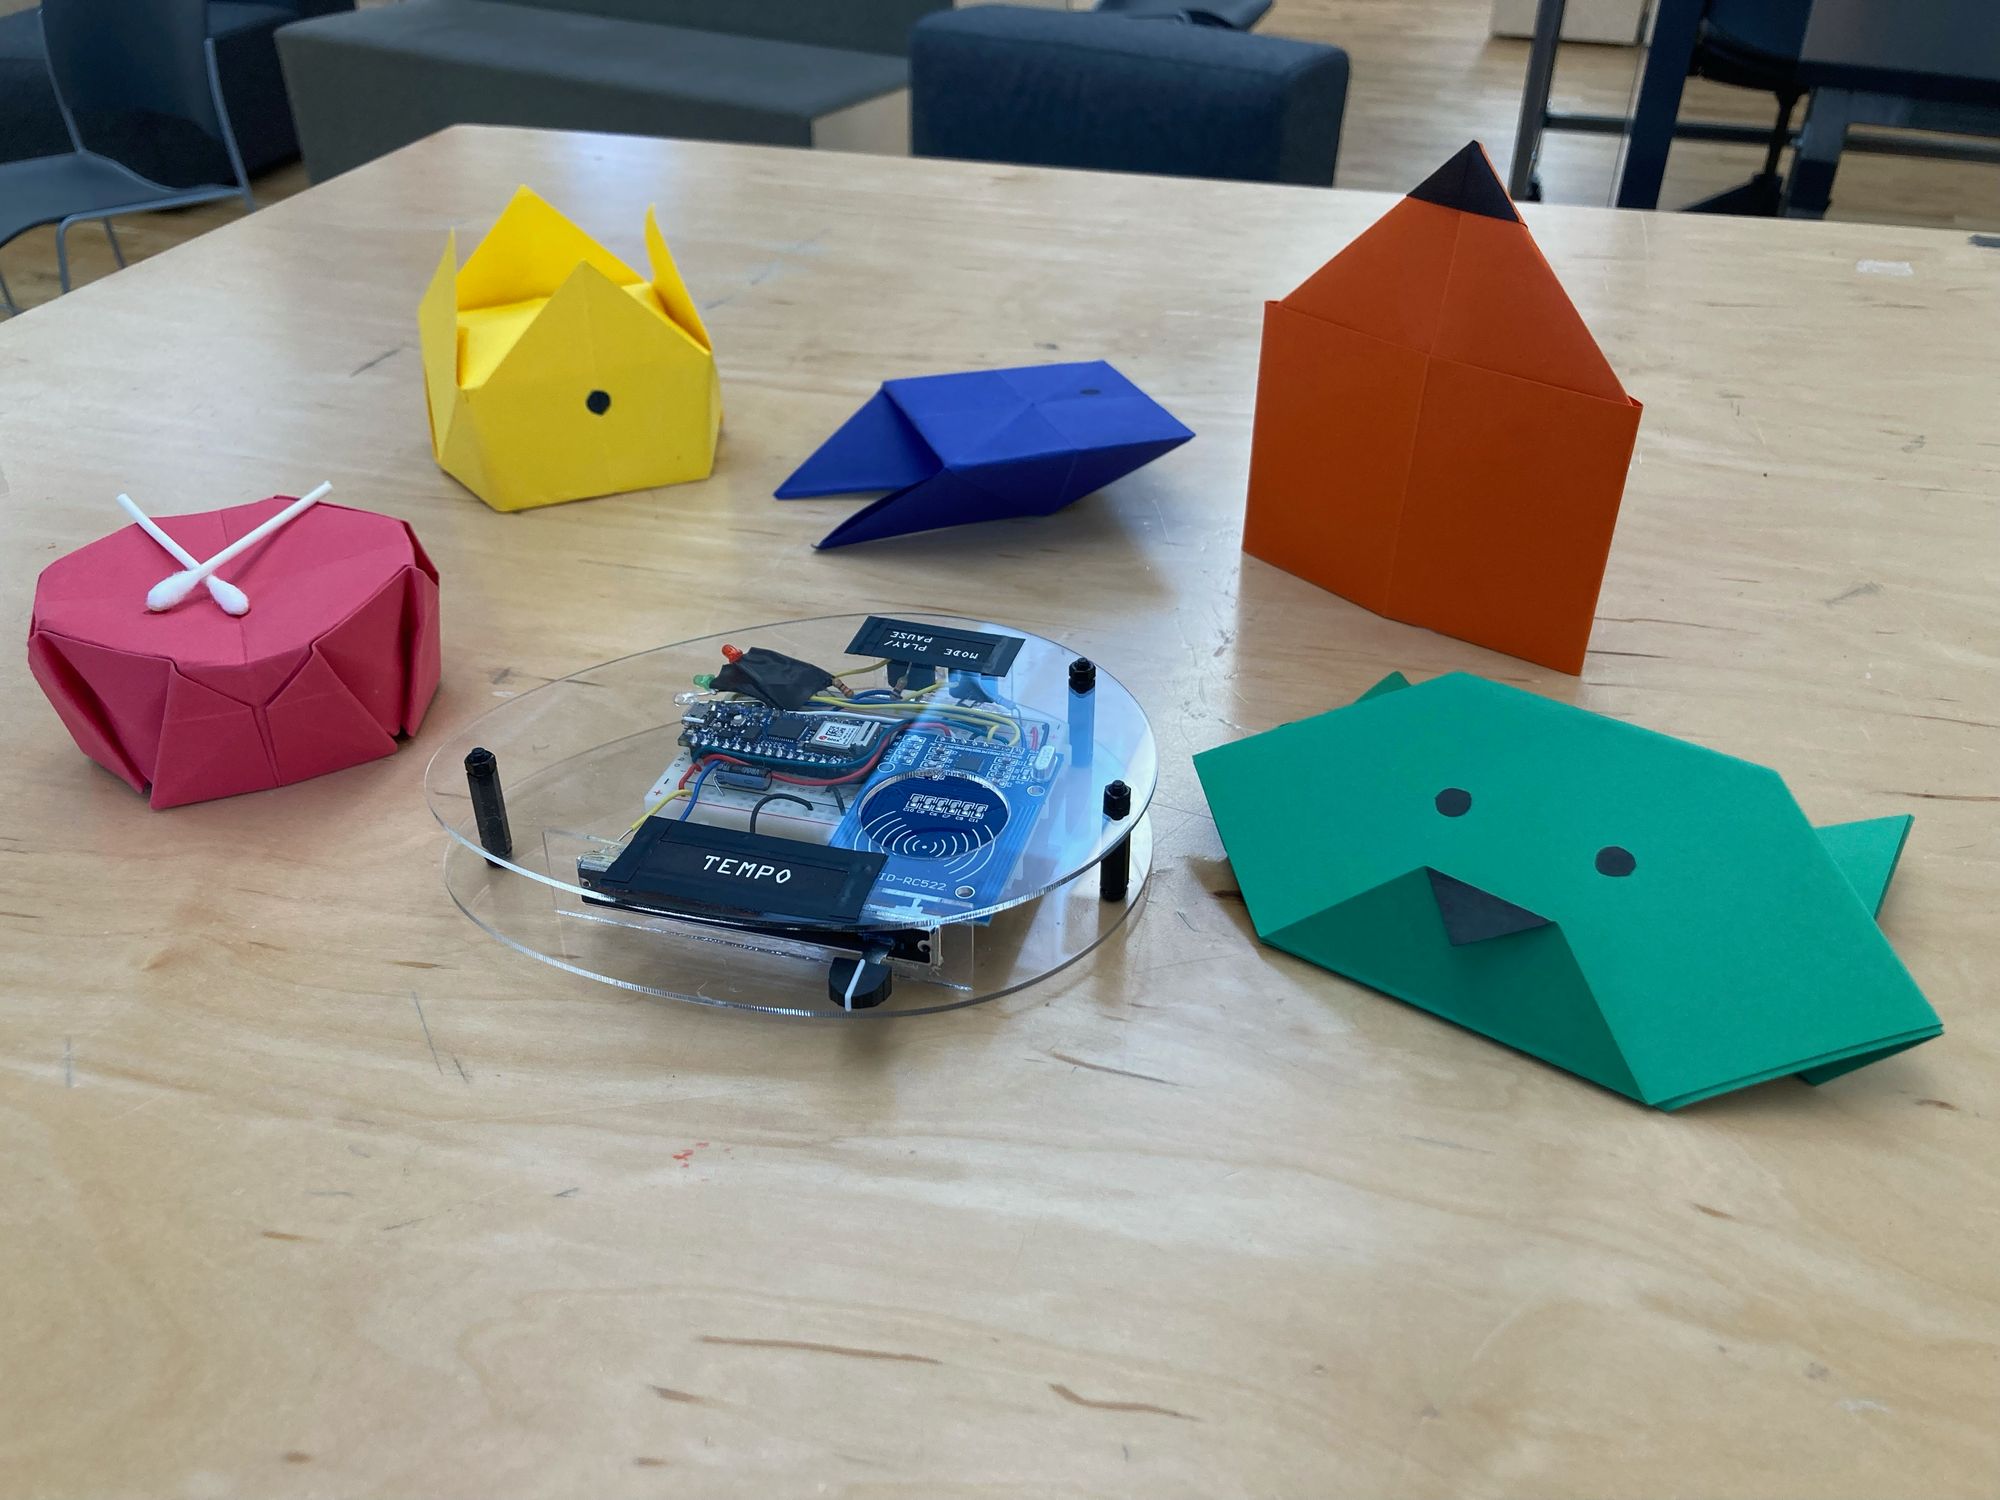
Two of the sample kits used for instrumentation were sourced from Drumkito: the recognizable 808 samples represented by the snare and the Casio MA-101 for the fish (a rather splashy/crunchy toy synth sound). Uppercussion’s free Bitkits 8-bit drum samples are associated with the crown. The pencil is associated with a set of stationary foley samples from Just Jared Beats, and the cat is associated with self-recorded beatboxing sounds (a pun on boots & cats and boots & cats…).
Why do origami for the objects? This mainly came down to a matter of practicality–while I almost went back to the household objects idea with the tags, the sturdiness of the DrumDrop enclosure and the aforementioned range issues meant that I needed the objects to present a flat underside close to the scanner and not be too heavy for fear of damaging the device.
If I had a do-over, I’d probably redesign/rethink the enclosure to have the objects match the look of the enclosure or vice versa. That said, I think the choice to go with origami helps make the project a bit more colorful and approachable. I hope the novelty of controlling the sound output with these objects at least serves as a proof of concept for having fun and allowing for performativity with a system like this.–12/13/22
Additional thanks
- Karina Chow and Daniel Wai for chatting about working with RFID
- Karl Olson for discussions around concept and Javascript
- Pure Origami and Origami.me
- Spencer Harris and Tres Pimentel for shop floor commiseration
- Olivia Kreitler for all the at-home and emotional support